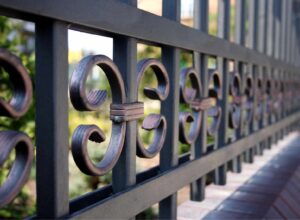
How to Paint a Metal Fence in Eight Steps
Painting a metal fence can enhance your outdoor space’s appearance and longevity. Despite the initial concerns, the process is simpler than you might think. Whether you’re dealing with a rusty fence or aiming for a quick and efficient paint job, we have you covered.
How to Paint a Metal Fence
Before you start painting, you must know what kind of metal your fence is made of. The type of metal will determine the right paint or varnish for the task. Take a look at this chart to see which paint or varnish matches your type of metal:
| Type of metal | Characteristics | Examples | Type of Paint |
| Ferrous | Subject to rust
Magnetic |
Steel
Wrought iron Cast iron |
Metal lacquer |
| Non-ferrous | Does not rust
Not magnetic |
Galvanized metal
Stainless steel Aluminum Zinc |
Aluzinc lacquer |
Once you have defined the type of paint you should use, you are ready to follow the steps from preparing the area to painting:
- Prepare the area: Clear the area around the fence of any obstacles or debris. Laying down drop cloths or tarps is a great idea to protect the ground from paint spills.
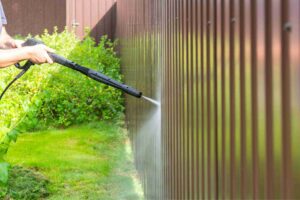
- Clean the fence: Use a wire brush or a pressure washer to remove any dirt, rust, or loose paint from the fence’s surface. You may also use a solution of warm water and mild detergent for cleaning. Rinse the fence thoroughly and allow it to dry completely before proceeding. We also have a great guide on how to clean a fence.
- Sand the surface: Once the fence is dry, use medium-grit sandpaper to roughen up the surface. This helps the paint adhere better to the metal. Wipe away any dust with a clean, damp cloth.
- Prime the fence: Apply a coat of metal primer to the entire surface of the fence. You can use a paintbrush or a sprayer for this step. Make sure to choose a primer that is specifically formulated for metal surfaces. Allow the primer to dry completely according to the manufacturer’s instructions.
- Apply the paint: Once the primer is dry, you can apply the paint (metal lacquer or Aluzinc lacquer depending on the type of metal). Stir the paint thoroughly before applying. You can use a paintbrush, roller, or sprayer, depending on your preference and the size of the fence. Apply the paint evenly, working in small sections to ensure full coverage. Allow the first coat to dry completely before applying additional coats, if necessary.
- Finish with a topcoat (optional): Finish with a clear topcoat or sealant to provide extra protection and durability.
- Clean up: Once you’ve finished painting, clean your tools and dispose of any leftover paint or materials properly.
- Allow to cure: Let the paint cure fully according to the manufacturer’s instructions before allowing any contact with the fence, such as leaning objects against it or hanging decorations.
How to Paint a Metal Fence Fast
There are some strategies you can follow to paint your metal fence fast:
- Use a paint sprayer: Paint sprayers can cover large areas quickly and evenly, reducing painting time compared to brushes or rollers. Make sure to -suitable for outdoor use- and follow the manufacturer’s instructions for best results.
- Use a roller with a long handle: A paint roller with a long handle can cover a large surface area quickly. It’s especially useful for flat or slightly textured surfaces on the fence.
- Opt for a paint and primer combination: Some paint products have built-in primers, allowing you to skip the separate priming step.
- Work in sections: Divide the fence into manageable sections and focus on painting one section at a time. This approach can help you maintain control over the painting process and ensure even coverage without feeling overwhelmed.
- Choose a fast-drying paint: Look for paint products labeled as fast-drying or quick-drying. These paints dry more rapidly than traditional paints, allowing you to apply multiple coats or finish the project sooner.
- Avoid overlapping strokes: When applying paint, try to avoid overlapping strokes excessively. This can create uneven coverage and prolong the drying time. Instead, work quickly and efficiently to cover each section of the fence with minimal overlap.
- Consider hiring a professional: If you have a large fence or limited time available, hiring a professional painting contractor may be worth considering. Professionals have the expertise, tools, and manpower to complete the job quickly and efficiently.
How to Prep a Metal Fence for Painting
Preparing your metal fence for painting will help you establish a clean, smooth, and properly primed surface that facilitates the adhesion and longevity of the paint. This process involves the following actions:
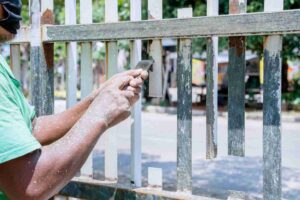
- Remove old paint and rust: Begin by removing any old paint or rust from the surface of the metal fence. You can use a wire brush, scraper, or sandpaper to scrape away the old paint and rust. Consider using a chemical rust remover or a power tool such as a wire brush attachment on a drill for larger areas or stubborn rust spots.
- Smooth the surface: After removing the old paint and rust, smooth out the surface of the metal fence using medium-grit sandpaper. This helps to create a roughened surface for better paint adhesion. Sand in the direction of the metal grain to avoid creating scratches or marks.
- Wipe down the surface: Once you’ve finished sanding, wipe down the entire surface of the fence with a clean, dry rag to remove any dust, debris, or loose particles. This step ensures the surface is clean and ready for priming and painting.
- Cover the surrounding area: Before applying any paint or primer, protect the surrounding area by covering nearby surfaces with drop cloths or plastic sheeting. This prevents accidental spills or splatters from damaging adjacent surfaces such as plants, buildings, or sidewalks.
- Apply a rust-inhibitive primer: Apply a rust-inhibitive primer to the metal fence to prevent future rusting and ensure better adhesion of the topcoat paint. Use a paintbrush or roller to apply the primer evenly over the entire surface of the fence. Choose a primer specifically designed for metal surfaces and follow the manufacturer’s instructions for application and drying times.
How To Paint a Metal Fence with a Spray Gun
Using a spray gun to paint a metal fence is highly efficient, although it may require a short adjustment period to become comfortable with the technique. Follow this guide to paint your metal fence efficiently:
- Before beginning, wear your protective gear, including goggles and a mask, to shield yourself from paint fumes and particles.
- Prepare your paint carefully to avoid lumps clogging the spray gun. Once your paint is properly prepared, load the tank of your spray gun.
- We recommend you practice using the spray gun on a piece of cardboard beforehand to familiarize yourself with its operation. Take a few shots with the spray gun until you feel confident. For instructions on how to use a paint sprayer, check this article.
- Paint the fence starting from one end and work your way systematically along its length. Remember to move your arm before pressing the trigger to release the paint. Strive to coat the entire fence evenly with paint, maintaining a steady pace to ensure consistent coverage.
How to Paint a Rusty Metal Fence
Painting a rusty metal fence requires some prep work, but the process can be straightforward. Even if you have a very rusty fence, a couple of coats of paint are usually enough to restore its appearance and provide protection against further corrosion – once the rust has been removed.
Follow this guide to revive your rusty metal fence:
- Remove the loose rust: Before applying paint, it’s crucial to eliminate any loose bits of rust to ensure a smooth finish. Use a wire brush to scrub the entire surface of the fence or gate, removing any loose rust. Remember to wear protective gear such as gloves and goggles while doing this to protect yourself from debris.
- Clean the fence: After removing as much rust as possible, wipe down the surface with a clean cloth to remove any remaining dust and dirt. This step ensures that the paint adheres properly. Check our previous article to learn more about how to clean a fence.
- Paint the fence: Once the surface is clean and dry, it’s time to start painting. Paint evenly over the entire surface of the fence or gate. Work systematically, starting from one end and moving methodically to ensure even coverage.
- Apply a second coat: After the first coat of paint has dried completely, apply a second coat for enhanced durability and coverage. This additional coat helps to further protect the metal from rust and corrosion.
Conclusion
Painting a metal fence becomes manageable with the right knowledge and techniques. Whether dealing with a chain link fence or rusty metal surface or using advanced methods like spray guns, thorough preparation and attention to detail are key. With these tips, you’re ready to tackle your next painting project and achieve professional-quality results confidently.